Installing Ruby
In order to follow along with the examples in this book, you'll need to have Ruby installed. If you want to try out Ruby without installing it on your home computer you can use an online development environment like Cloud9. Note: You should also have git installed and configured as well.
Cloud 9

Cloud 9 provides a great way to get up and running quickly. They offer a free account for basic use, so users can begin coding immediately.
To get started using Cloud 9, navigate to their website and create a free account. If you already have a Github account it's a good idea to sign in with that. After you've created your account you'll want to create a new workspace. Select the 'Ruby' option, fill in the Name and Description fields, and click 'Create'. After a minute you'll see that a new workspace and new project have been created for you. You'll be looking at the readme file, at the root of your project directory. Press ⌘ + n (or ctrl + n on windows) to create a new file. Then press ⌘ + s to save the file. Name the file first.rb (note the rb extension for ruby files). By default, the new file will be saved to your root directory. On the first line of the file type, puts 'hello' and then save the file with ⌘+ s (you can optionally click File, Save). Click in the smaller narrow box located at the bottom of the screen. It is the command prompt for your development environment. Since you saved your file first.rb in the root directory, to run your file you simply type, 'ruby first.rb' and press enter. The result should be the word 'hello' output to the terminal.
Congratulations! your development environment is set up and you've just written your first Ruby program.
Update:
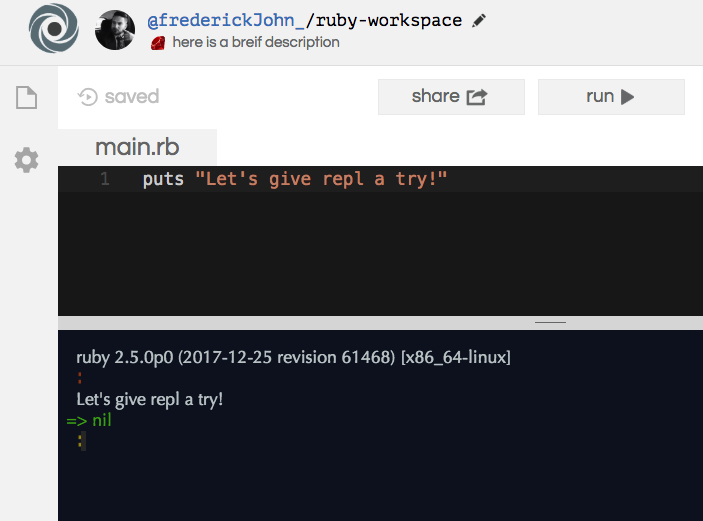
Since the first publication of this book, Amazon has acquired Cloud9. In order to practice with a free online development environment, I recommend repl.it.
Repl offers a variety of programming languages with a customizable work space. Users can choose from a light or dark theme, as well as a side vs stacked layout. Here is an example of a Ruby workspace on Repl.
Repl is free and incredibly easy to set up and start using. I highly recommend trying it.
Installing Ruby on Cent OS
![]()
To install Ruby on Cent OS, follow the detailed instructions below. These installation instructions have been tested with Cent OS 7 and Ruby 2.4.0.
Step 1 – update the OS
Step 2 – Install curl
Step 3 – Install public key, then rvm
Step 4 – Install rvm dependencies
Step 5 – Install Ruby
Step 6 – Set default Ruby version
--- Detailed Instructions ---
Step 1: sudo yum install update
Step 2: sudo yum install curl
Step 3-a: gpg --keyserver hkp://keys.gnupg.net --recv-keys 409B6B1796C275462A1703113804BB82D39DC0E3
Step 3-b: curl -L get.rvm.io | bash -s stable
Step 4: rvmsudo yum install -y gcc-c++ patch readline readline-devel zlib zlib-devel libyaml-devel libffi-devel openssl-devel make bzip2 autoconf automake libtool bison iconv-devel
Step 5: rvm install 2.4.0
Step 6: rvm use 2.4.0 –default
Installing Ruby on Debian/Ubuntu
![]()
The installation process is similar across linux distributions. This process does use git to clone repositories and thus you'll need to have git installed. Install git with the command sudo apt-get install git.
The first step is to update the operating system and then install some necessary dependencies.
sudo apt-get update
sudo apt-get upgrade
sudo apt-get install git-core curl zlib1g-dev build-essential libssl-dev libreadline-dev libyaml-dev libsqlite3-dev sqlite3 libxml2-dev libxslt1-dev libcurl4-openssl-dev python-software-properties libffi-dev nodejs
Once you have installed the dependencies you can install Ruby with a packager manager. This is the preferred way of installing Ruby because you'll have the ability to work with different versions of Ruby on your operating system. For Debian/Ubuntu we are going to use rbenv. Run the following commands to download rbenv to your computer:
git clone https://github.com/rbenv/rbenv.git ~/.rbenv
echo 'export PATH="$HOME/.rbenv/bin:$PATH"' >> ~/.bashrc
echo 'eval "$(rbenv init -)"' >> ~/.bashrc
exec $SHELL

git clone https://github.com/rbenv/ruby-build.git ~/.rbenv/plugins/ruby-build
echo 'export PATH="$HOME/.rbenv/plugins/ruby-build/bin:$PATH"' >> ~/.bashrcexec $SHELL
exec $SHELL

rbenv install 2.4.0
rbenv global 2.4.0
After you've finished this run ruby -v to check that the correct version of Ruby is installed.
If you are having trouble follow Digital Ocean's guide for installing Ruby and Rails on Debian 8 or Ubuntu 16.04.
Installing Ruby on Mac OS
![]()
If you are using Mac OS, you should be using Homebrew as your package manager. If you don't have Homebrew installed run this command:
ruby -e "$(curl -fsSL https://raw.githubusercontent.com/Homebrew/install/master/install)"
Confirm Homebrew is installed correctly by typing which brew , then proceed with the installation.
brew update
brew install rbenv ruby-build rbenv-gem-rehash
echo eval "$(rbenv init -)" >> .bash.rc
The last line adds a line to your .bashrc file. Rbenv is now installed as the package manager and we can install the latest version of Ruby.
rbenv install 2.4.0
rbenv global 2.4.0
If you haven't already installed git on your Mac, do so now:
brew install git
After git is installed you'll need to configure your credentials:
git config --global user.name "Your Name Here"
git config --global user.email "your_email@example.com"